

In this post I’ll talk to you guys about one of the most important aspects of audio engineering, setting up and tuning your monitors for a room.
To understand the concepts of this post you will need to understand the basics of Acoustics like Standing Waves, Nodes and Antinodes, Sound Reflection, Diffusion, and Absorption.
If you haven’t heard of these concepts before I suggest you do a quick google search, understand them and then come back to this Blog Post.
Okay, so I’m going to break this down into 5 Simple Steps:
The first step to understanding and setting up a good listening environment is to understand exactly how your speaker sounds.
Ronak Runwal Tweet
Step no. 1
Understand your Speaker
The first step to understanding and setting up a good listening environment is to understand exactly how your speaker sounds. In all when we look at the sound of a room there are two factors involved.
1. The sound of the Speakers
2. The sound of the Room
1. The sound of the Speakers
2. The sound of the Room

It is practically impossible to have a perfect anchor point without having a judgment of these two aspects.
What do I mean by the sound of the speakers?
Okay, I’m sure you have heard many songs on different speakers and noticed that different elements of a song are exaggerated on different speakers. This happens because of the frequency response of the speakers itself.
Some speakers might be bright, some might be dull, some might be boomier i.e have more bass, etc.
To give you some examples the Neumann KH120A are more Mid Driven Speakers and you can clearly see it in the frequency response. Whereas, the HS5’s are more exaggerated in the upper high frequencies.
You can go through the manual of your speaker and find out the frequency response to get a starting point to understand the sound of your speakers. Once you know this, you can then move on to understanding the sound of room and finding a position that compliments the speaker with the room.
Step no. 2
Understand your Room
When sound is created between any two fixed limits, like the walls of a room, it creates something called standing waves.
This is a byproduct of the physical nature of reflection of sound waves and the main factor that defines the sound of a room. These standing waves are determined by the dimensions of a room i.e the L x B x H.
In most cases with home listening environments, we won’t have the ability to change the dimensions of a room, so we will work the other way round and set the speakers for the best possible setup for that room.
Although if you have a room that’s a perfect square, chances are that turning this room into a critical listening environment will be practically impossible.
You can use a simple tool like room Mode Calculator to find the Nodes and Antinodes in your Room.
Step no. 3
Find the best placement of Speaker according to Room
Now that you know what your Room and Speakers sound like, the next step is to align the speakers in a way to get the best out of your room.
1. Start with your speakers aligned to the back wall of your room and form an equilateral triangle along the longest dimension of your room.
1. Start with your speakers aligned to the back wall of your room and form an equilateral triangle along the longest dimension of your room.
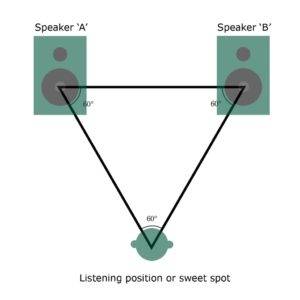
2. Make sure that the speakers are equally angled and the point just before where they merge will be the sweet spot.
3. Now using a signal generator listen to the low frequencies i.e 20 Hz to 200Hz and see if you get any sudden build ups or cancellations.
4. Chances are based on the Room nodes you will find some frequencies building up and cancelling in the room.
5. Repeat the same process over the Low Mid and High Frequencies.
6. Now move the speakers away from the front wall and bring them more towards the back wall.
7. You will reach a point where the response of the room will flatten the further you move away from the front wall. ( It will usually lie around 3/8 the length of the room but keep doing this exercise in small increments from the front wall, so you hear the difference in the room.
Now comes the question of pairing the speakers with your room, if you inherently have speakers that don’t generate too much low end you can use Boundary Interference i.e SBIR to bring out the lower frequencies in the room, though you should ideally do this only after treating your front wall.
If your speakers are generating a lot of high mid frequencies you need to treat the sidewalls or your first reflection points to reduce the buildup. Now the question arises of how to measure these changes in the sound of the speakers as you move them?
That’s where the next step comes into play.
Step no. 4
Using REW
REW is free software that lets you measure the frequency response of the room.
You can download it off the website at https://www.roomeqwizard.com/
You can go through a simple software guide to understand how to use this software.

Measure the response of your speakers along with these points and use the information from the graphs to find out the best point where the frequency response of the speakers and room flattens out.
Ensure that you’re marking the positions that you place the speakers in so you can revert to them at a later stage.
Ensure that you’re marking the positions that you place the speakers in so you can revert to them at a later stage.
Step no. 5
Basic Room Treatment
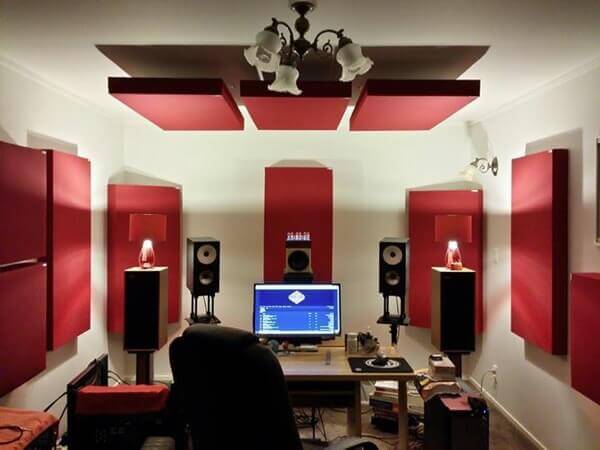
Once you’ve found a good spot around the length of the room you can look at doing some basic sound treatment for your room to bring out the best possible sound out of them.
1. Start by creating Bass Traps
2. Treat the first reflection points
3. Absorb the back wall
4. Absorb and Angle the Ceiling and Side Walls
5. Create a Reflection Free Zone
I will cover the basic Room Treatment Topics in another blog post. Till then you can refer to the Amazing Eathen Wieners Articles at https://realtraps.com/articles.htm
Get in touch!
If you guys have another other questions you would like to shoot at me, just shoot me a mail at ronak@gray-spark.com.
Exclusive